

Series
썸네일 이미지 출처 : NestJs and Socket.io chat application with data persistence
이전 장에서 MySQL에 geometry 데이터 타입을 저장하고 GeoJSON 포맷으로 데이터를 수정하는 과정을 진행하였습니다. 이번 장에서는 웹소켓 기반의 socket.io 라이브러리를 통해 실시간 위치 전송 기능을 구현해보겠습니다.
NestJS과 웹소켓
웹소켓
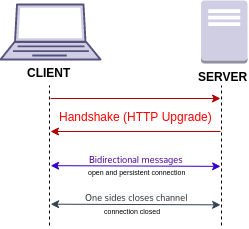
RFC 6455 명세서에 정의된 프로토콜인 웹소켓(WebSocket)을 사용하면 서버와 브라우저 간 연결을 유지한 상태로 데이터를 교환할 수 있습니다. 이때 데이터는 ‘패킷(packet)’ 형태로 전달되며, 전송은 커넥션 중단과 추가 HTTP 요청 없이 양방향으로 이뤄집니다. 이런 특징 때문에 웹소켓은 온라인 게임이나 주식 트레이딩 시스템같이 데이터 교환이 지속적으로 이뤄져야 하는 서비스에 아주 적합합니다.
출처 : javascript.info - 웹소켓
웹소켓 프로토콜은 HTTP 폴링과 같은 반이중방식에 비해 더 낮은 부하를 사용하여 웹 브라우저(또는 다른 클라이언트 애플리케이션)과 웹 서버 간의 통신을 가능케 하며, 서버와의 실시간 데이터 전송을 용이케 합니다. 이는 먼저 클라이언트에 의해 요청을 받는 방식이 아닌, 서버가 내용을 클라이언트에 보내는 표준화된 방식을 제공함으로써, 또 연결이 유지된 상태에서 메시지들을 오갈 수 있게 허용함으로써 가능하게 되었습니다.
출처 : wikipedia - 웹소켓
웹소켓의 한계
앞서 언급했듯 HTML5에 최적화 된 프로토콜이기 때문에 HTML5 이전의 기술로 구현된 서비스에서는 동작하지 않게 됩니다. 이를 보완하기 위해 nodeJS의 경우 socket.io나 sockJS, 스프링의 경우 STOMP라는 기술을 추가적으로 사용하며, 이를 이용해 해당 브라우저에 맞게 동작할 수 있게 설정할 수 있습니다. NestJS에서는 websocket과 socket.io 모두 지원합니다.
Socket.io

socket.io는 node.js 기반으로 실시간 이벤트 서버를 개발할 수 있는 오픈소스 라이브러리입니다. 멀티 디바이스(web, android, ios, windows)를 지원하며, ws를 지원하지 않는 브라우저도 직관적으로 지원합니다.
websocket server는 client와 서버 간에 http protocol로 커넥션을 초기에 맺고 ws-websocket protocol로 upgrade한 후 서로에게 heartbeat를 주기적으로 발생시켜 커넥션이 유지되고 있는지 체크하며 네트워크를 유지하는 방식입니다.
주요 개념
Namespace, room, and event
Namepace, room은 Socket.io에서 트래픽을 격리하여 구분할 때 사용되는 단위입니다. event는 명칭 그대로 송/수신하는 이벤트의 이름을 말합니다.
트래픽격리 구분없이 이벤트를 송/수신하면 이벤트 리스너를 등록하여 이벤트를 처리하는 코드가 존재하지 않더라도 접속한 모든 client에 전송 및 수신을 하게 됩니다.
과도하게 많거나 설계가 중구난방이면 불필요한 트래픽이 발생하게 되고 서버 자체의 성능도 저하되기 때문에 적절한 설계로 구분할 필요가 있습니다.
특징
- 기본 namespace는 “/”
- room은 namespace의 하위개념
- 같은 namespace, 같은 room 안에서만 통신 가능
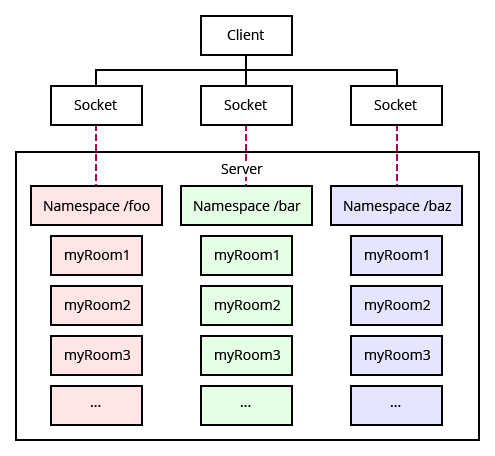
이미지 출처 : Node.js Socket.io Namespaces, Rooms and Connections 02
Public & Private & Broadcasting
socket io에서 이벤트를 송수신하는 방식입니다.
- public : 이벤트를 송신하게 되면 송신한 자와 수신받는 자 모두 이벤트를 수신
- broadcasting : 이벤트 송신자는 제외하고 수신자만 이벤트를 수신
- private : 특정 client에게만 이벤트를 전송
socket.io와 ws의 차이
1. socket.io는 추가적인 설치 필요
2. ws는 string 형으로 데이터를 전송
- socket.io는 event 명과 데이터를 명확하게 구분하고 모든 자료형을 주고 받을 수 있습니다.
3. ws에는 room이 없습니다.
- namespace는 ws에서도 지원하지만 room과 broadcast 같은 socket.io 기능을 ws에선 직접 만들어야 합니다.
4. 자신을 제외한 사용자에게 데이터를 보낼 경우
- socket.io : 서버.broadcast.emit(’이벤트명’, 데이터)
- ws : for 반복으로 클라이언트.send(데이터) 전송
5. socket.io는 연결이 끊어져도 주기적으로 연결을 시도합니다
- 같은 기능을 구현하려면 ws는 추가적인 코드를 필요
6. socketIO에서는 to, of 같은 특정 클라이언트를 지정하는 기능도 제공합니다
Gateway 생성
의존성 주입, 데코레이터, 예외 필터, 파이프, 가드 및 인터셉터와 같은 NestJS 대부분의 개념은 게이트웨이에 동등하게 적용됩니다. 가능한 경우, NestJS는 HTTP 기반 플랫폼, 웹소켓 및 마이크로서비스에서 동일한 구성 요소를 실행할 수 있도록 구현 세부 사항을 추상화합니다.
Nest에서 게이트웨이는 간단한 @WebSocketGateway() 데코레이터로 주석이 달린 클래스입니다. 기술적으로, 게이트웨이는 플랫폼에 구애받지 않으므로 어댑터가 생성되면 모든 웹소켓 라이브러리와 호환됩니다.
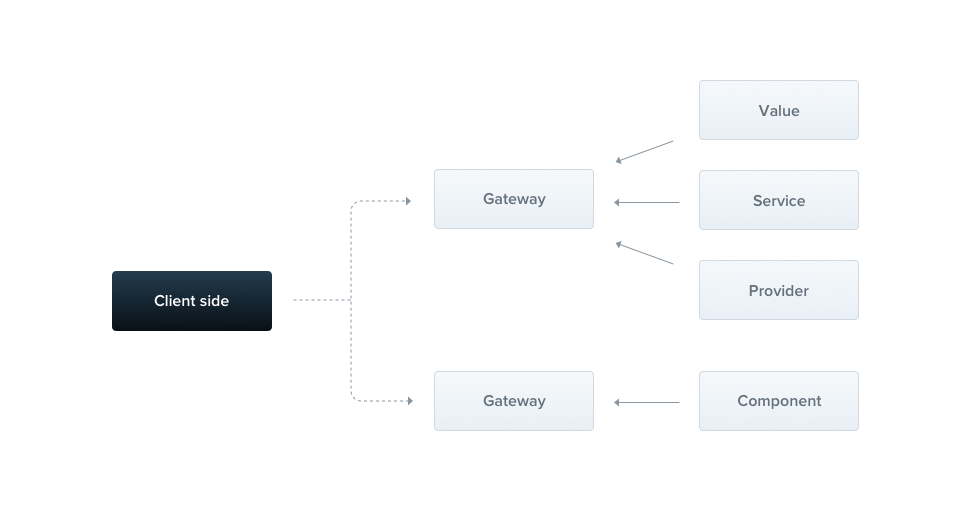
Gateway는Provider로 취급될 수 있습니다. 이는 클래스 생성자를 통해 종속성을 주입할 수 있다는 것을 의미합니다. 또한,Gateway는 다른 클래스(Provider및Controller)에 의해 주입될 수 있습니다.
Gateway를 생성하기 위해 관련 패키지를 먼저 설치합니다.
$ npm i --save @nestjs/websockets @nestjs/platform-socket.io
그 후, 여러 모듈에서 socket의 주요 객체를 사용해야 하기 때문에 각 파라미터들의 structural subtyping을 지원하기 위해 interface를 설정해주겠습니다.
// /entities/socket.interface.ts
export interface Room {
  name: string;
}

export interface JoinRoom {
  locationId: number;
  userId: number;
}

export interface Message {
  userId: number;
  message: Object;
  roomName: string;
}
그리고 gateway 코드는 아래 코드와 같습니다.
//socket.gateway.ts
import { MessageBody, SubscribeMessage, WebSocketGateway, WebSocketServer, OnGatewayConnection, OnGatewayDisconnect } from "@nestjs/websockets";
import { Message, JoinRoom } from "./entities/socket.interface";
import { Server, Socket } from "socket.io";
@WebSocketGateway(3030, {
transports: ["websocket"],
cors: {
origin: "*",
},
})
export class SocketGateway implements OnGatewayConnection, OnGatewayDisconnect {
constructor() {}
@WebSocketServer()
server: Server = new Server();
@SubscribeMessage("chat")
handleChatEvent(@MessageBody() payload: Message): Message {
console.log("handleChatEvent payload", payload);
this.server.to(payload.roomName).emit("chat", payload);
return payload;
}
@SubscribeMessage("join_room")
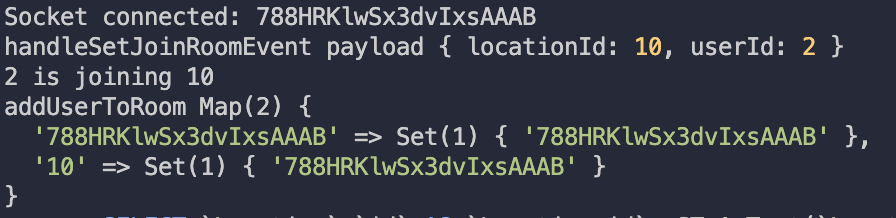
handleSetJoinRoomEvent(@MessageBody() payload: JoinRoom): string {
console.log("handleSetJoinRoomEvent payload", payload);
const roomName = `${payload.locationId}`;
if (payload.userId) {
console.log(`${payload.userId} is joining ${roomName}`);
this.server.socketsJoin(roomName);
console.log("addUserToRoom", this.server.sockets.adapter.rooms);
return roomName;
} else {
return roomName;
}
}
handleConnection(socket: Socket): void {
console.log(`Socket connected: ${socket.id}`);
}
handleDisconnect(socket: Socket): void {
console.log(`Socket disconnected: ${socket.id}`);
}
}
그럼 gateway 코드를 한번 하나씩 자세히 알아보겠습니다.
@WebSocketGateway() : 브라우저와 서버 간의 실시간, 양방향 및 이벤트 기반 통신을 가능하게 하는 NestJS의 게이트웨이로 클래스를 표시하는 데코레이터입니다. 이 데코레이터의 파라미터로 socket의 port나 cors를 설정할 수 있습니다. 또한 namespace를 설정할 수 있습니다.
CORS 참고 자료 : CORS란 무엇인가?
class SocketGateway implements OnGatewayConnection, OnGatewayDisconnect : SocketGateway 클래스에서 소켓이 연결되거나 연결이 끊겼을 때를 처리하기 위해 OnGatewayConnection와 OnGatewayDisconnect 객체를 implements 하였습니다. implements 와 extands 의 차이는 OOP적 관점에서 봐야 합니다.
implements와extands의 차이
extands: 원하는 클래스를 명시하면 부모 클래스의 프로퍼티와 메서드를 따로 구현하지 않아도 자식 인스턴스에서 자유롭게 사용 가능
implements: 어떤 인터페이스를 채택하면 추상화 된 메서드나 프로퍼티를 반드시 구현즉,
SocketGateway클래스에서OnGatewayConnection클래스와OnGatewayDisconnect클래스의 메서드를 사용하고 싶다면,SocketGateway클래스에서handleConnection메서드와handleDisconnect메서드를 직접 구현해야 합니다. (OnGatewayConnection와OnGatewayDisconnect를 보면 interface로 선언된 것을 확인할 수 있습니다.)참고 자료 : [TS] Extends와 Implements 차이 (Difference between extends and implements)
@WebSocketServer() : Socket.io의 서버를 표시하는 데코레이터입니다. server: Server = new Server(); 에서 선언한 server 인스턴스를 통해 Socket.io의 Server API를 사용할 수 있습니다.
예를 들어, 소켓을 room에 join 하고 싶다면 this.server.socketsJoin(roomName); 메서드를 사용하면 됩니다.
또한 특정 room에 접속해있는 모든 클라이언트에게 이벤트 전달하기 위해서는 this.server.to(payload.roomName).emit('chat', payload); 메서드를 사용하면 됩니다.
관련 API Document : socket.io - Server API
@SubscribeMessage('') 데코레이터를 통해 클라이언트와 통신할 이벤트를 정할 수 있습니다. 저는 클라이언트가 특정 room에 join 하는 이벤트와 메시지를 전송하는 이벤트를 만들었습니다.
// socket.module.ts
import { Module } from "@nestjs/common";
import { SocketGateway } from "src/socket/socket.gateway";

@Module({
  providers: [SocketGateway],
  exports: [SocketGateway],
})
export class SocketModule {}
// app.module.ts
import { Module } from "@nestjs/common";
import { AppController } from "./app.controller";
import { AppService } from "./app.service";
import { ConfigModule } from "@nestjs/config";
import { DatabaseModule } from "./database/database.module";
import { LocationModule } from "./location/location.module";
import { SocketModule } from "./socket/socket.module";

@Module({
  imports: [ConfigModule.forRoot({ isGlobal: true }), DatabaseModule, LocationModule, SocketModule],
  controllers: [AppController],
  providers: [AppService],
})
export class AppModule {}
app 모듈에 SocketModule 를 import하고 앱을 실행해보겠습니다.

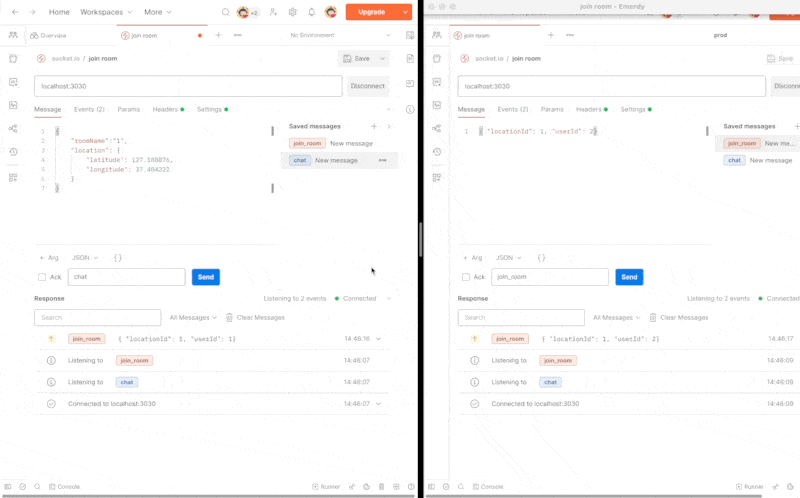
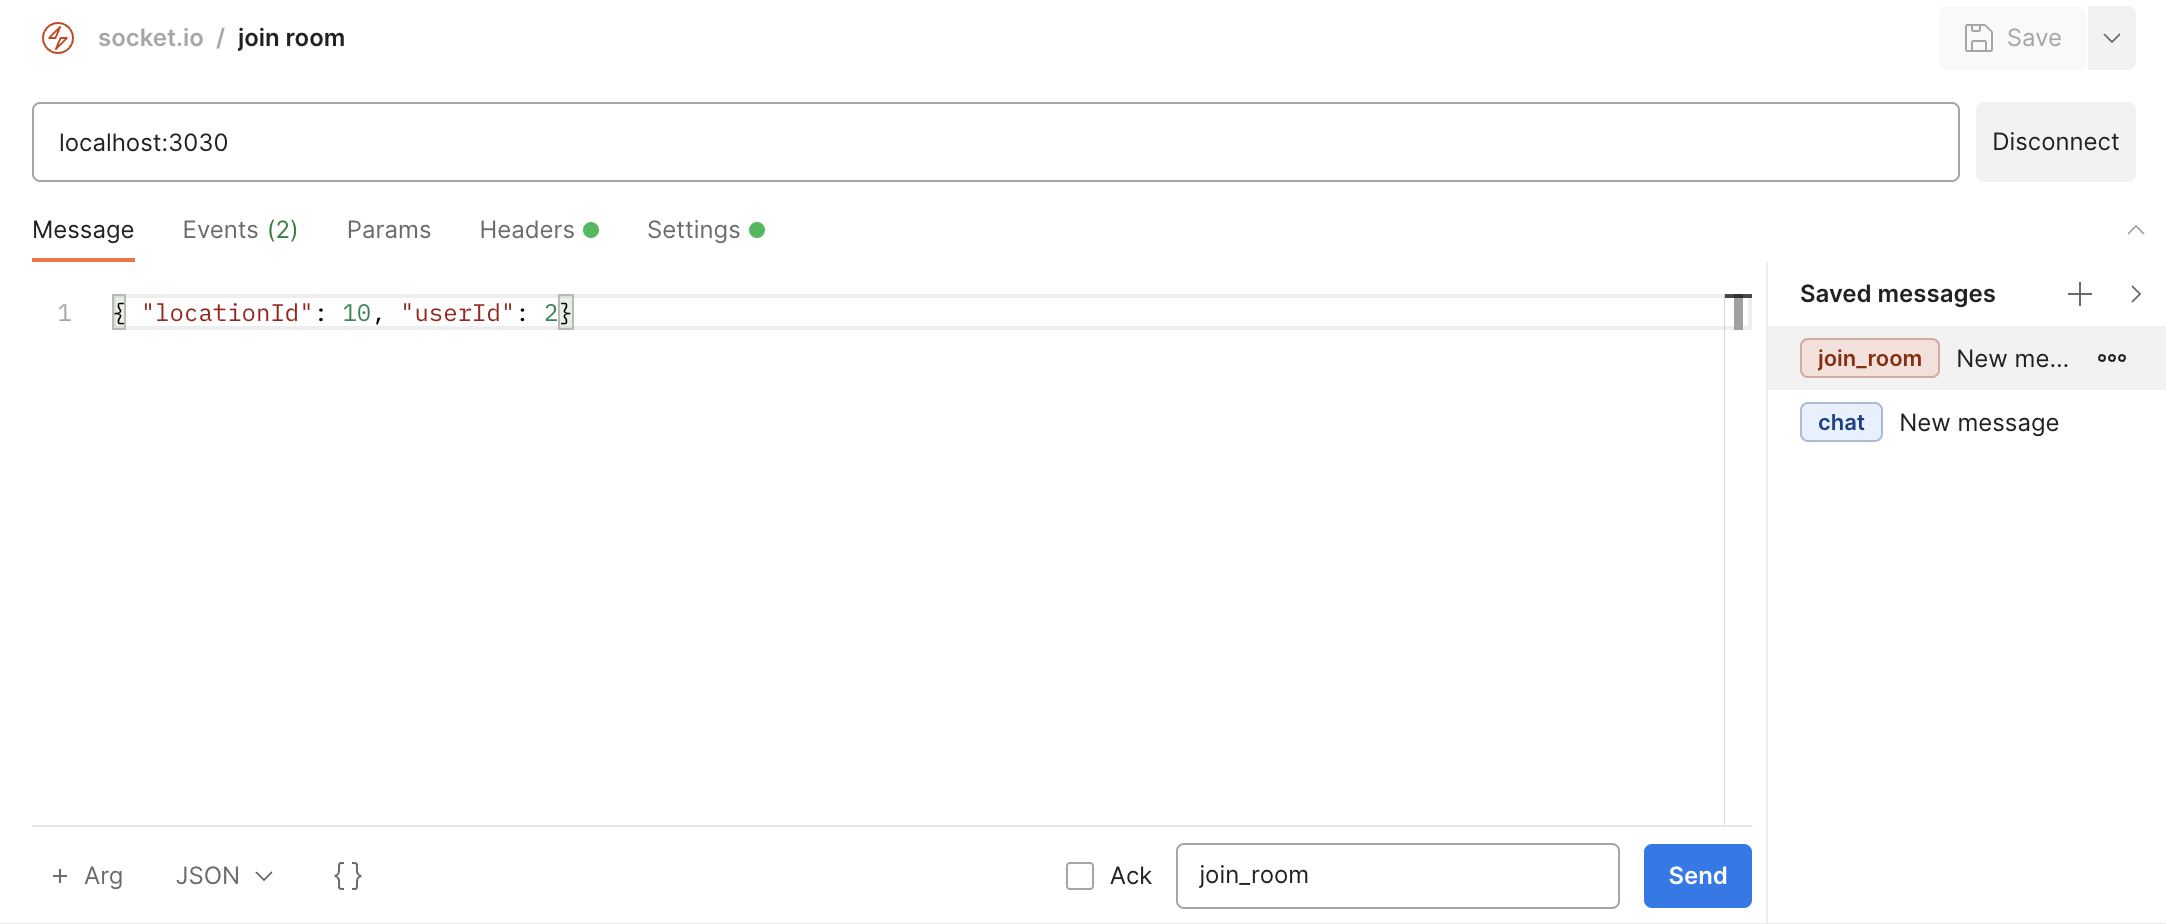
socket.io 통신을 테스트하기 위해 postman의 socket.io 전용 request를 생성하고 통신을 해보겠습니다. 우선 제가 socketgateway 데코레이터에서 지정한 port로 connect을 해줍니다. 그리고 @SubscribeMessage('') 에서 정의한 이벤트를 postman client에서 listen할 수 있도록 해줍니다. 원활한 통신이 가능한지 테스트하기 위해 postman을 2개 실행해보죠.
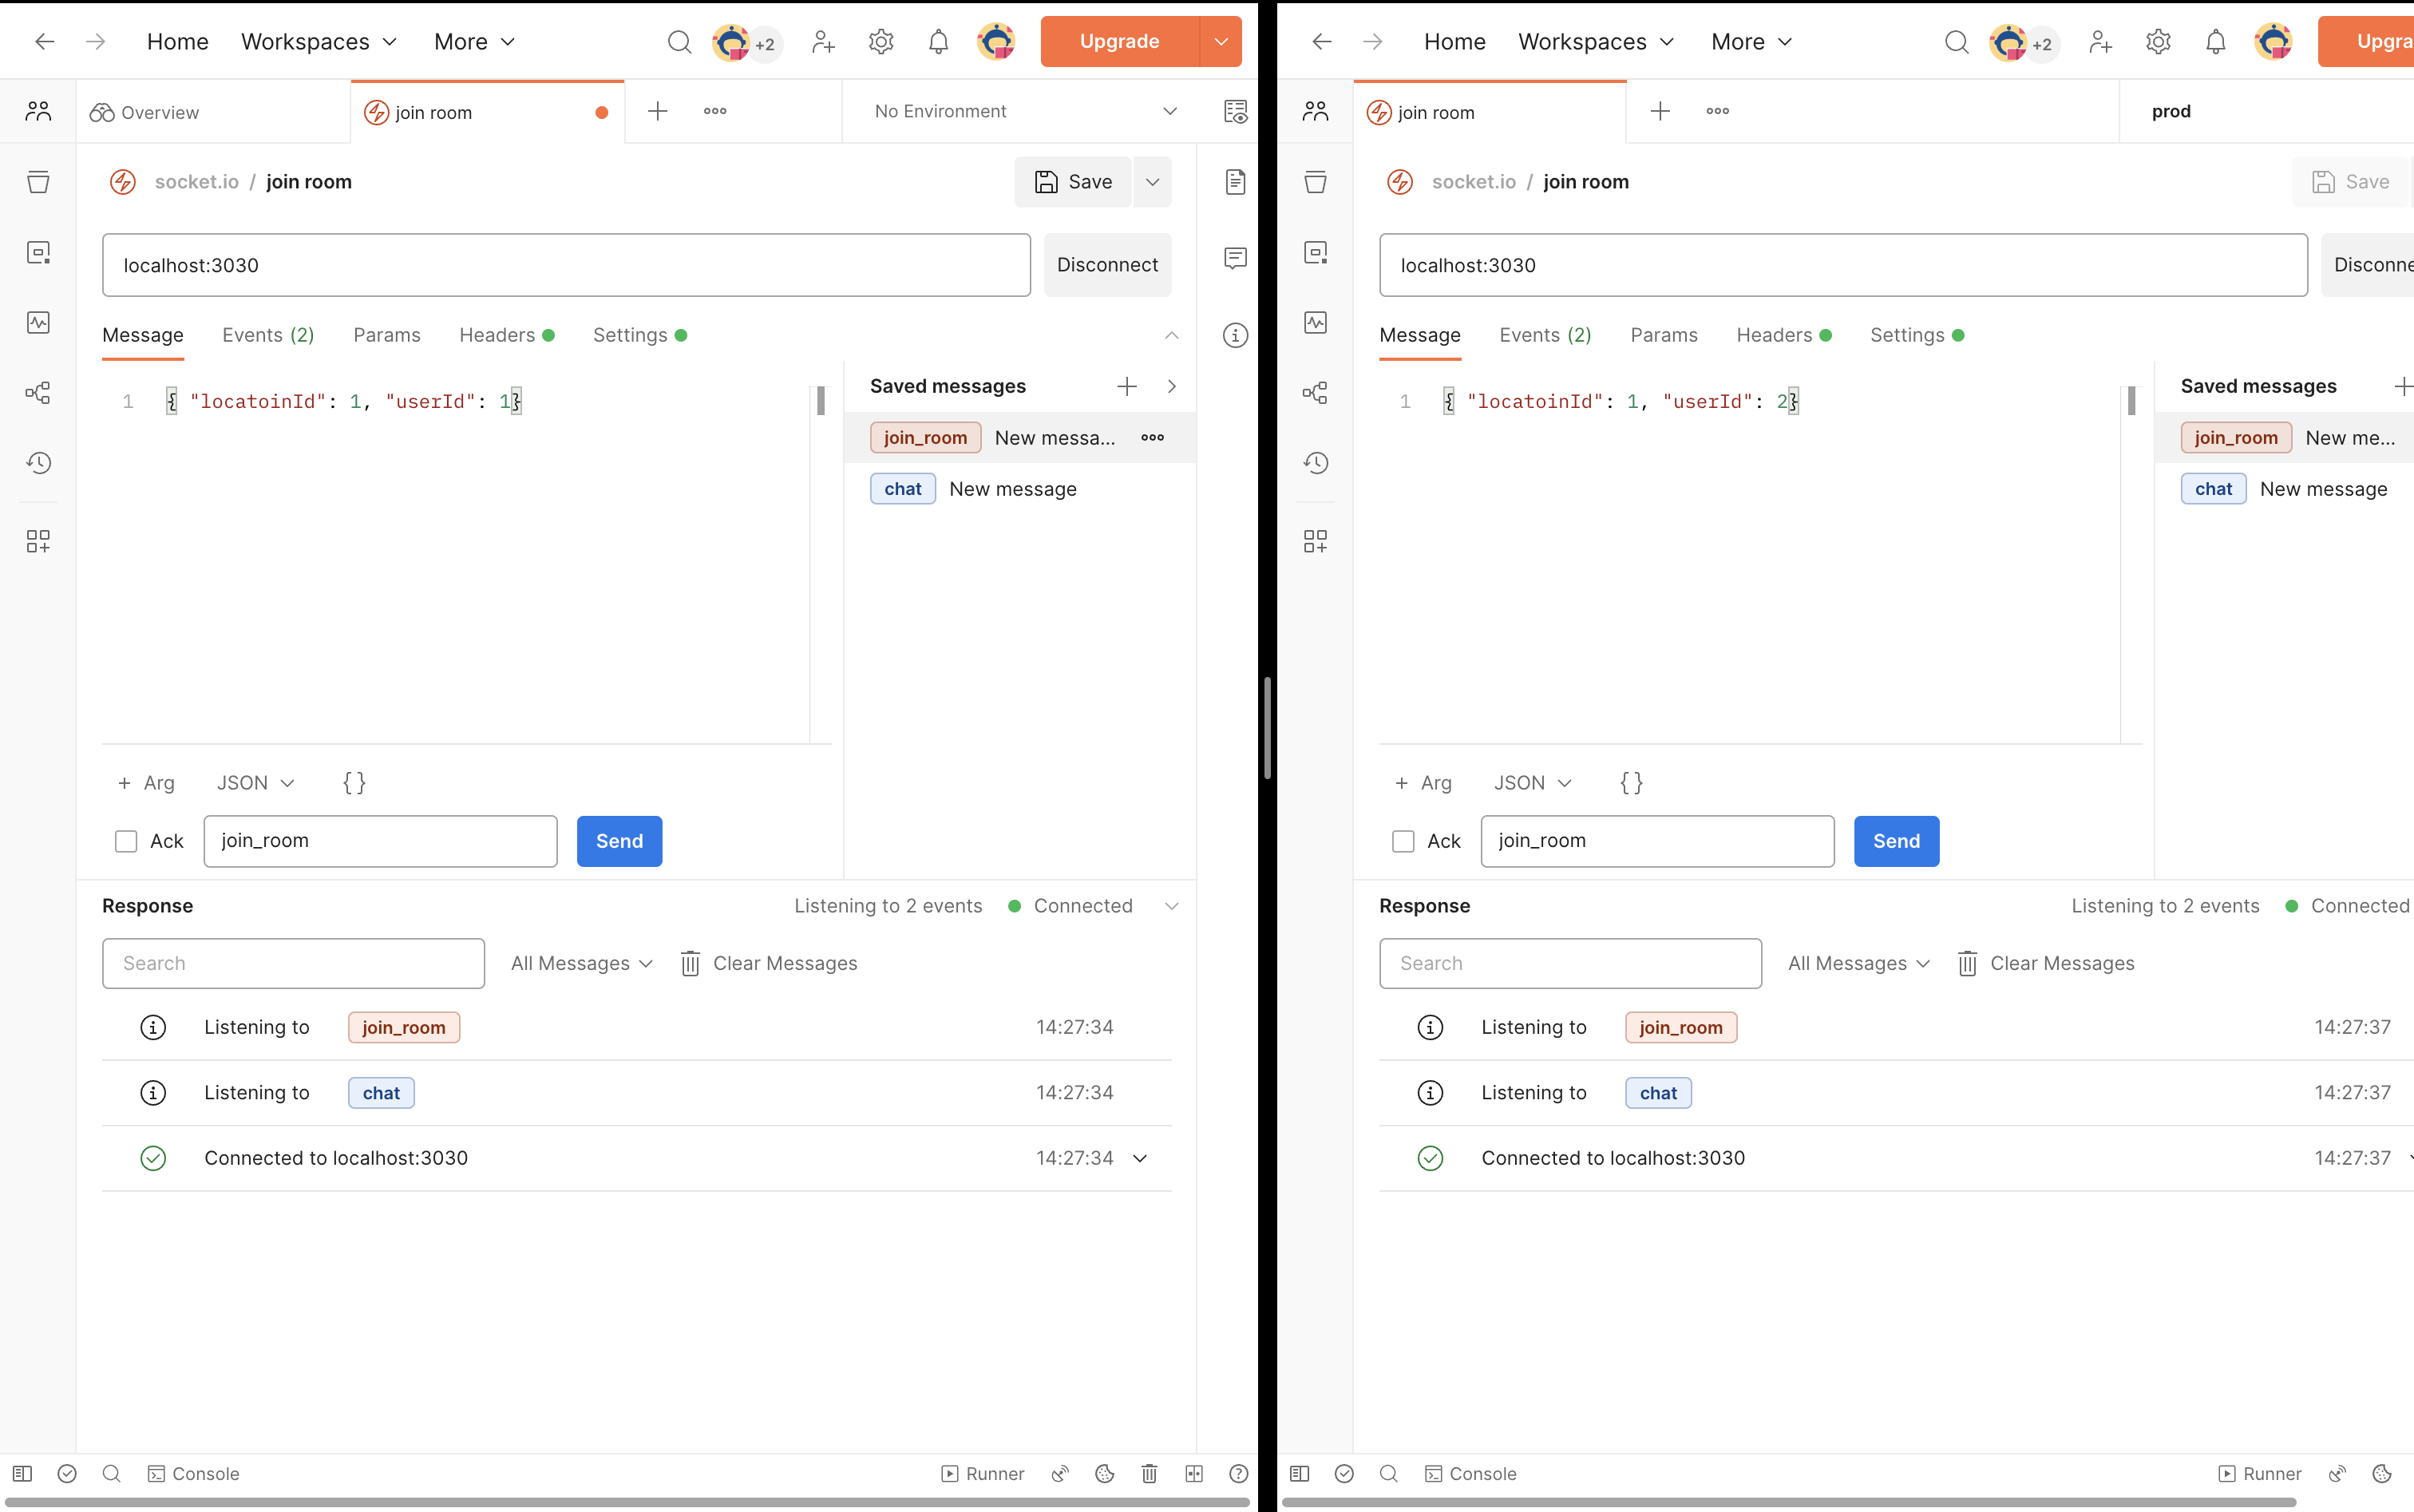

두 클라이언트를 connect을 해주었습니다. 그럼 이제 두 클라이언트를 room에 join해보겠습니다. room name은 locationId입니다. (room name은 반드시 string 타입이어야 합니다.)
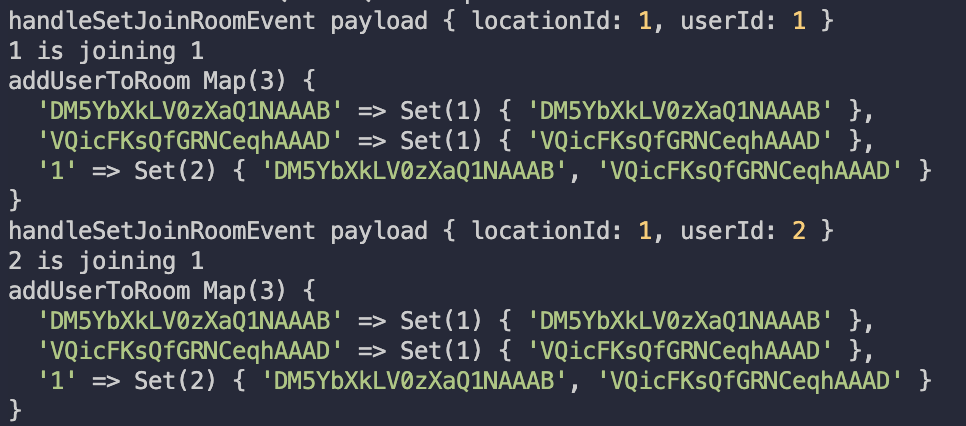
이름이 ‘1’인 room에 각각의 소켓이 join된 것을 확인할 수 있습니다. 그럼 이제 id가 1인 유저가 위치 정보를 전송해보겠습니다.
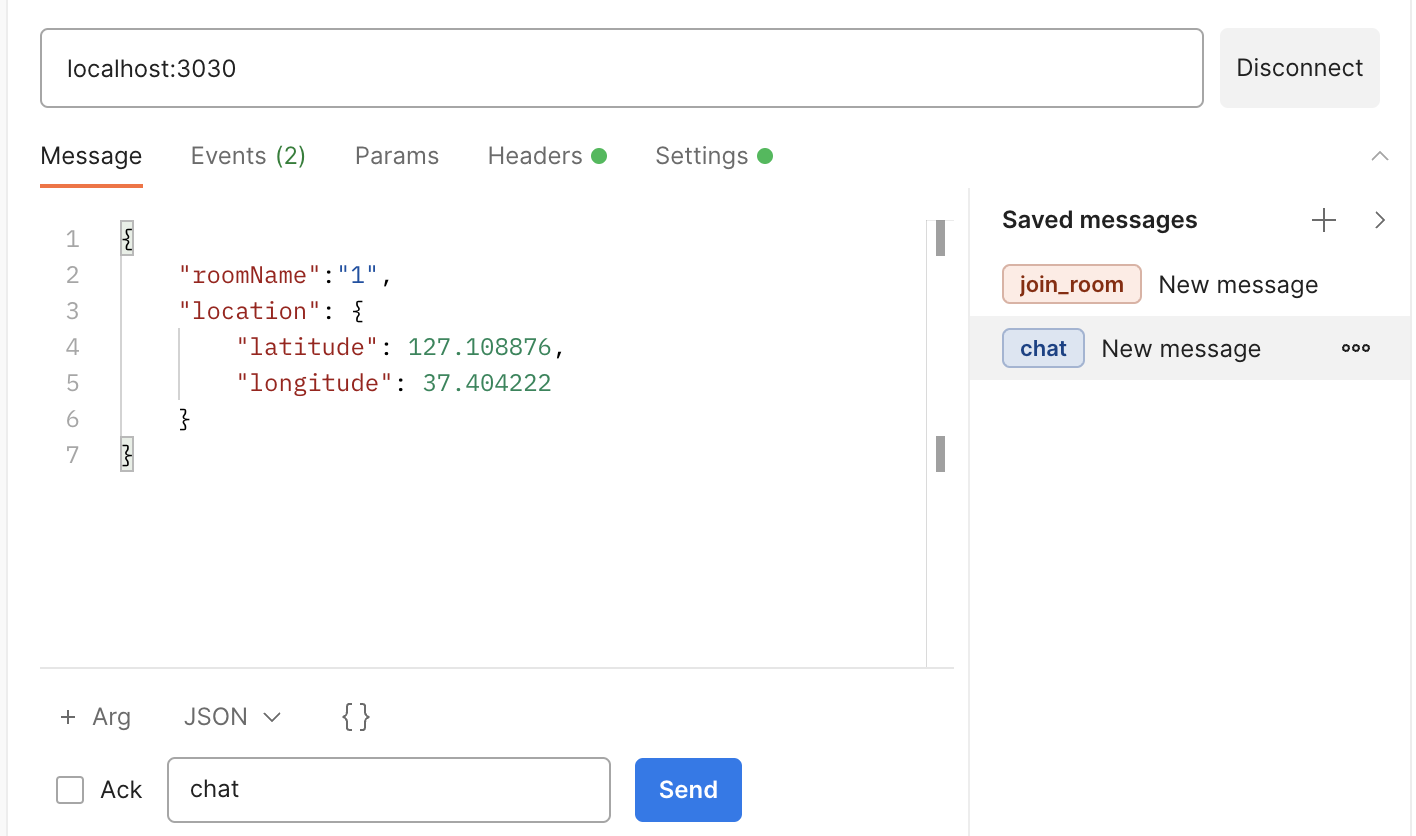
메시지에 roomName과 위치값을 넣고 chat 이벤트로 전송해보겠습니다.

room 안에 있는 모든 사용자들에게 메시지가 전송되었습니다!
역할 분리
저희 프로젝트에서 사용자의 위치를 업데이트하는 작업은 반드시 데이터베이스와 연결되어야 합니다. 저희는 이러한 작업은 웹소켓 통신이 아니라 HTTP 통신으로 수행하기로 하였습니다. socket.io기반의 socketGateway는 실시간 데이터 전송만을 담당하며 그 외 인증, 데이터 처리 등의 작업은 locationService 에서 처리하여 역할을 분리하였습니다.
Location Controller과 연결
이를 위해 첫번째로 Location Module에서 SocketModule을 import해줍니다.
// location.module.ts
import { Module } from "@nestjs/common";
import { LocationService } from "./location.service";
import { LocationController } from "./location.controller";
import { locationProviders } from "./location.providers";
import { DatabaseModule } from "../database/database.module";
import { SocketModule } from "src/socket/socket.module";

@Module({
  imports: [DatabaseModule, SocketModule],
  controllers: [LocationController],
  providers: [...locationProviders, LocationService],
  exports: [...locationProviders, LocationService],
})
export class LocationModule {}
LocationController 에서 SocketGateway 클래스를 통해 메시지를 전송합니다. 그리고 이전에 정의한 Message, JoinRoom interface도 import 해줍니다.
//location.cotroller.ts
...
import { SocketGateway } from 'src/socket/socket.gateway';
import { Message, JoinRoom } from '../socket/entities/socket.interface';

@Controller('location')
export class LocationController {
  constructor(private readonly locationService: LocationService, private readonly socketGateWay: SocketGateway) {}
...
}
그럼 위치가 업데이트되는 api가 호출될 때 socket.io를 통해 실시간으로 업데이트된 위치 정보를 전송하도록 update api를 수정해보겠습니다.
//location.cotroller.ts
...
@Put()
  async update(@Headers() headers: any, @Body() body: any, @Res() res: Response) {
    try {
      const userId = 1;
      const updatedLocationResult = await this.locationService.update(body);
      const roomName = `${updatedLocationResult.id}`;
      const sockets = await this.socketGateWay.server.in(roomName).fetchSockets();
      console.log('sockets', sockets);
      const joinRoomPayload: JoinRoom = { userId: userId, locationId: updatedLocationResult.id };
      this.socketGateWay.handleSetJoinRoomEvent(joinRoomPayload);
      const chatPayload: Message = { userId: userId, message: updatedLocationResult, roomName: roomName };
      const message = this.socketGateWay.handleChatEvent(chatPayload);
      console.log('message', message);
      return res.status(HttpStatus.CREATED).json({
        status: HttpStatus.CREATED,
        data: { updatedLocationResult },
      });
    } catch (e) {
      console.log(e);
      return res.status(e.status).json(e.response);
    }
  }
위 controller에서는 예시 코드 이기 때문에 인증 과정을 추가하지 않고 사용자의 id를 하드코딩하였습니다. 실무에서는 반드시
@UseGuards()를 통해 인증 과정을 통해 사용자의 id를 사용해야 합니다.
우선 postman으로 socket.io 클라이언트를 연결하겠습니다.
socket.io의 room 이름을 업데이트되는 location의 id를 string으로 설정하였습니다.
그 후 await this.socketGateWay.server.in(roomName).fetchSockets(); 를 통해 해당 room에 연결되어 있는 socket 인스턴스를 전부 출력하였습니다.
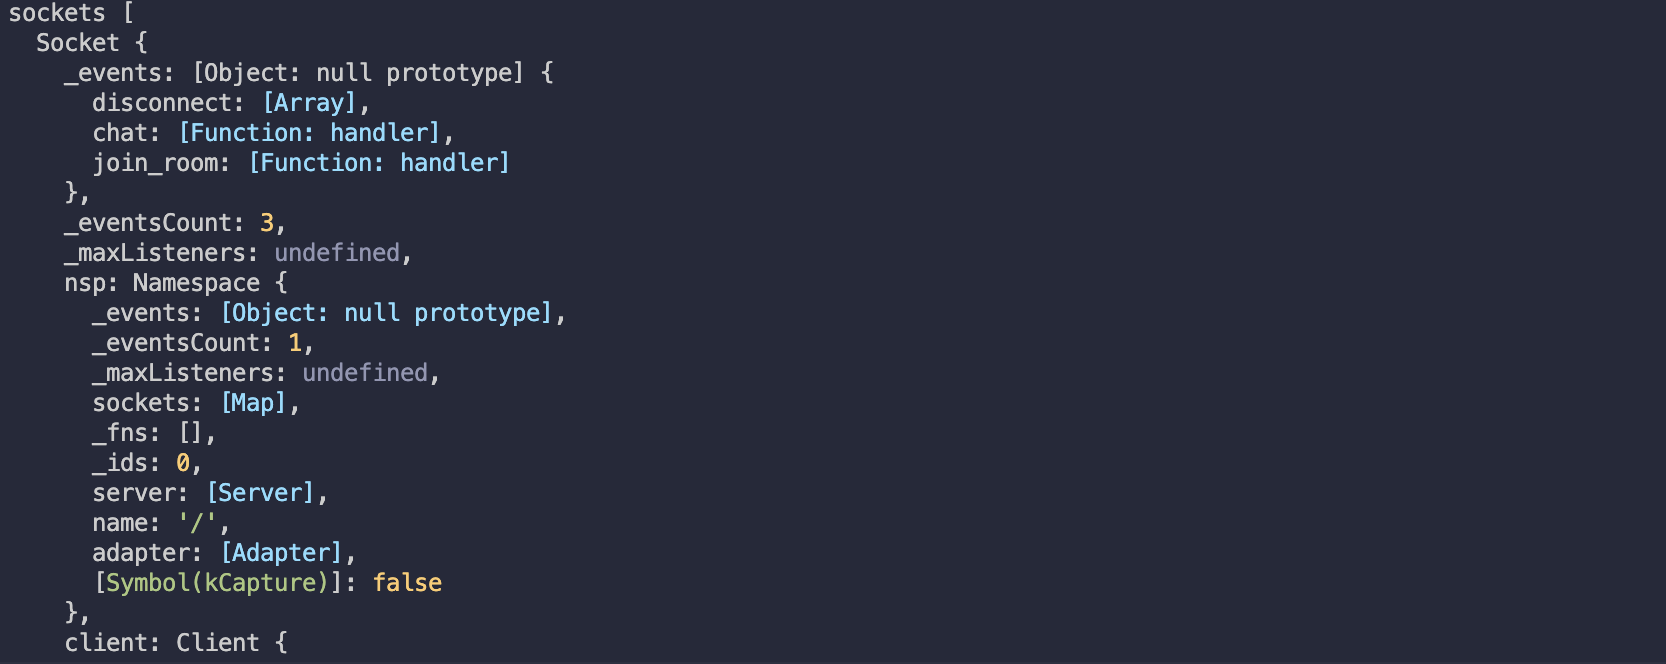
콘솔에서 이전에 연결한 소켓이 출력되는 것을 확인할 수 있습니다.
그럼 이제 postman으로 위치 update api를 요청해보겠습니다.
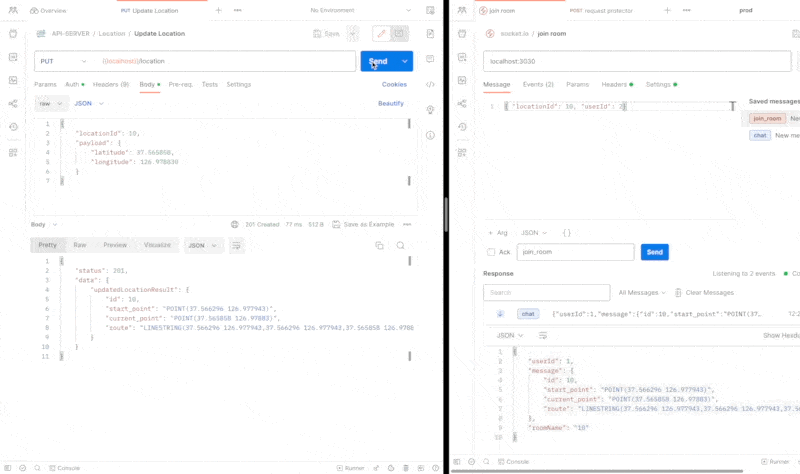
update api를요청할 때마다 같은 room에 접속한 사용자에게 실시간으로 위치를 전송하는 것을 확인할 수 있습니다!
번외) Docker & Nginx에서 socket.io 접속
만약 Docker와 Nginx 등을 통해 socket.io를 연결해야 하는 경우 아래의 과정을 거치면 됩니다.
# docker-compose.yml
example-app-container:
    ...
    ports:
      - 3000:3000
      - 3030:3030
    ...
    networks:
      - server
docker-compose.yml 파일에서 socket.io를 사용하는 port를 연결해 줍니다.
...
# Dockerfile에서 socket.io의 리스닝 포트를 추가합니다.
EXPOSE 3000
EXPOSE 3030
...
다음은 rever proxy 구조의 Nginx의 config 파일을 수정해줍니다.
...
upstream app {
    server example-app-container:3000;
  }

  upstream chat {
    server example-app-container:3030;
  }

...
server {
    listen 80;
    #listen [::]:80;

    location /nginx_status {
            stub_status on;
            access_log off;
            allow all;
    }
    location /api/ {
      if ($request_method !~ ^(GET|POST|HEAD|OPTIONS|PUT|DELETE)$) {
        return 405;
      }
      autoindex_localtime on;
      proxy_pass http://app/;
      ...
    }

    location /chat {
      proxy_pass http://chat/socket.io;
      proxy_redirect off;
			...
    }
  }
nginx를 사용하여 revere proxy를 구축하고 socket.io로 통신하고자 하는 경우 중요한 부분은 location과 proxy_pass 입니다.
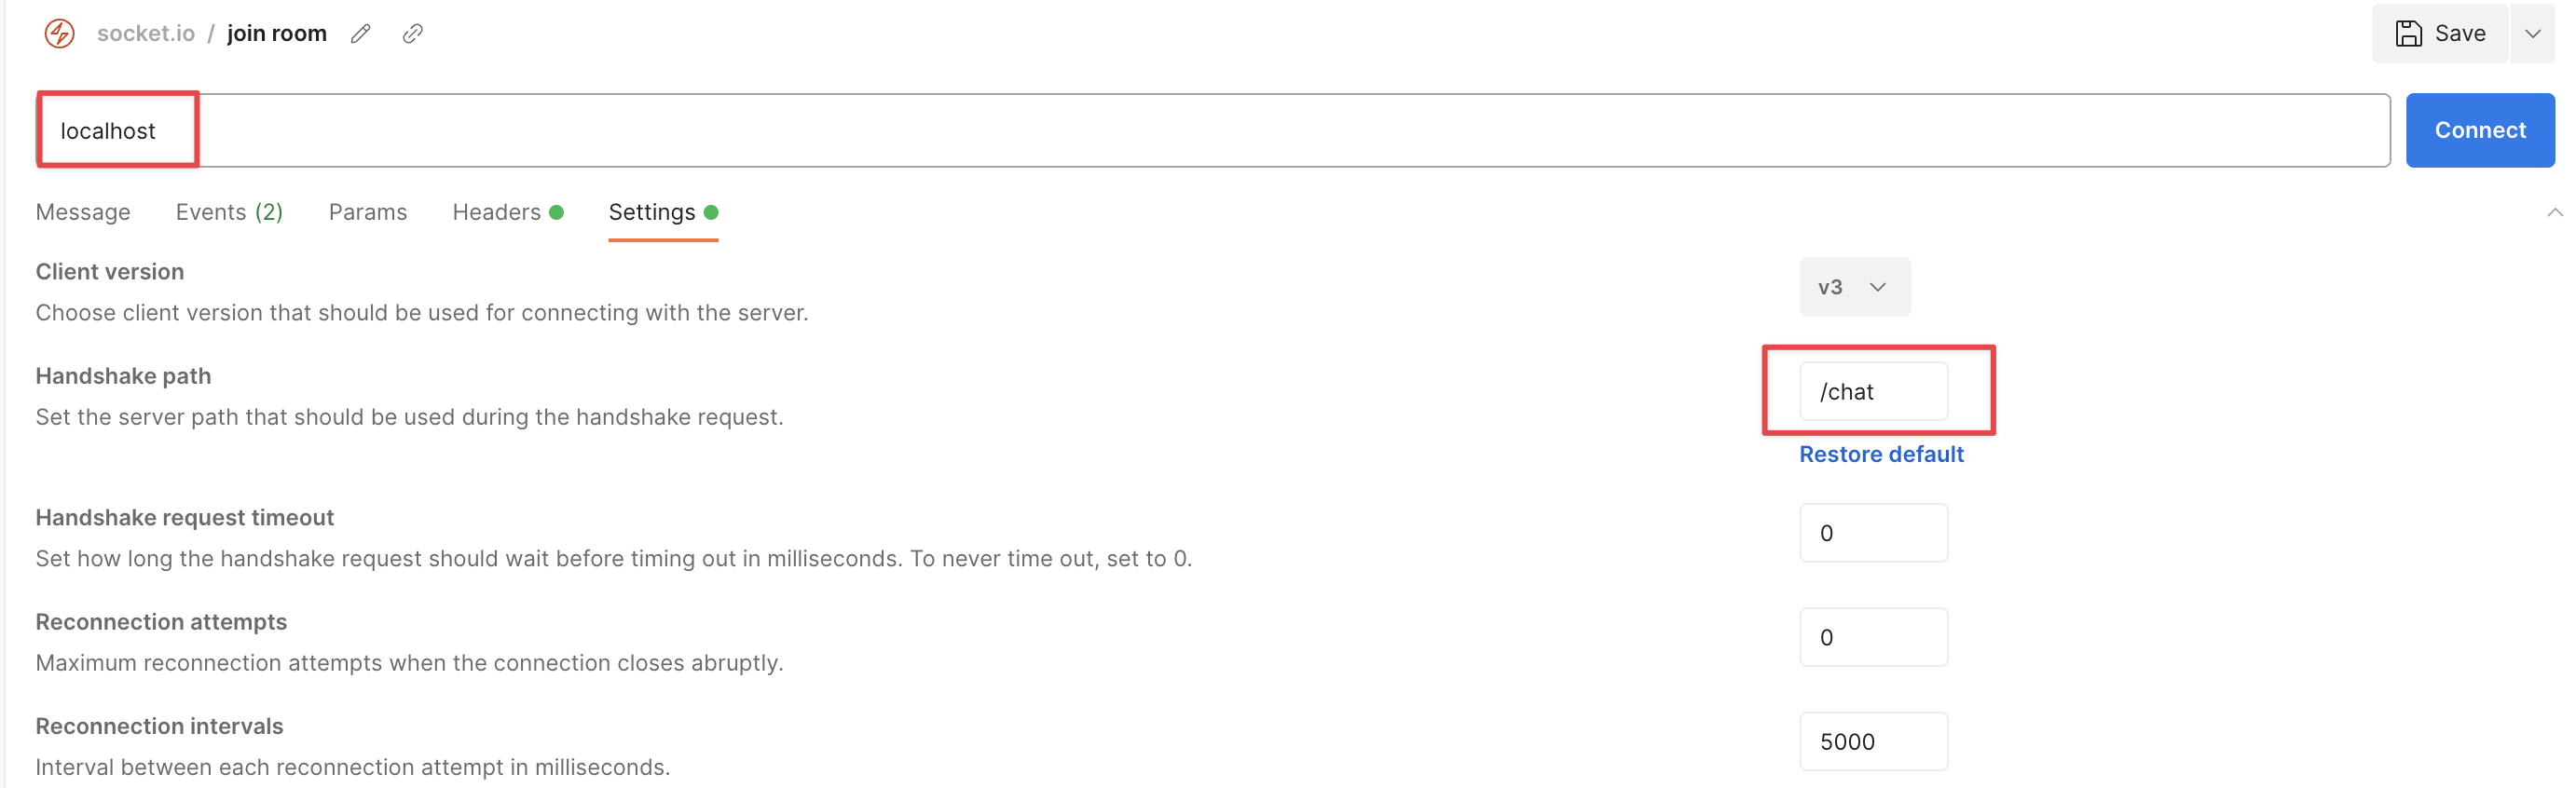
socket.io의 server 객체와 client 객체를 생성할 때 둘 간의 handshake을 위한 path를 설정해줘야 합니다.
생략시 디폴트 값은 socket.io 로 지정됩니다. 저희가 이전에 테스트했던 postman의 socket.io setting 옵션을 보면 path가 디폴트인 socket.io로 설정되어 있는 걸 확인할 수 있습니다.
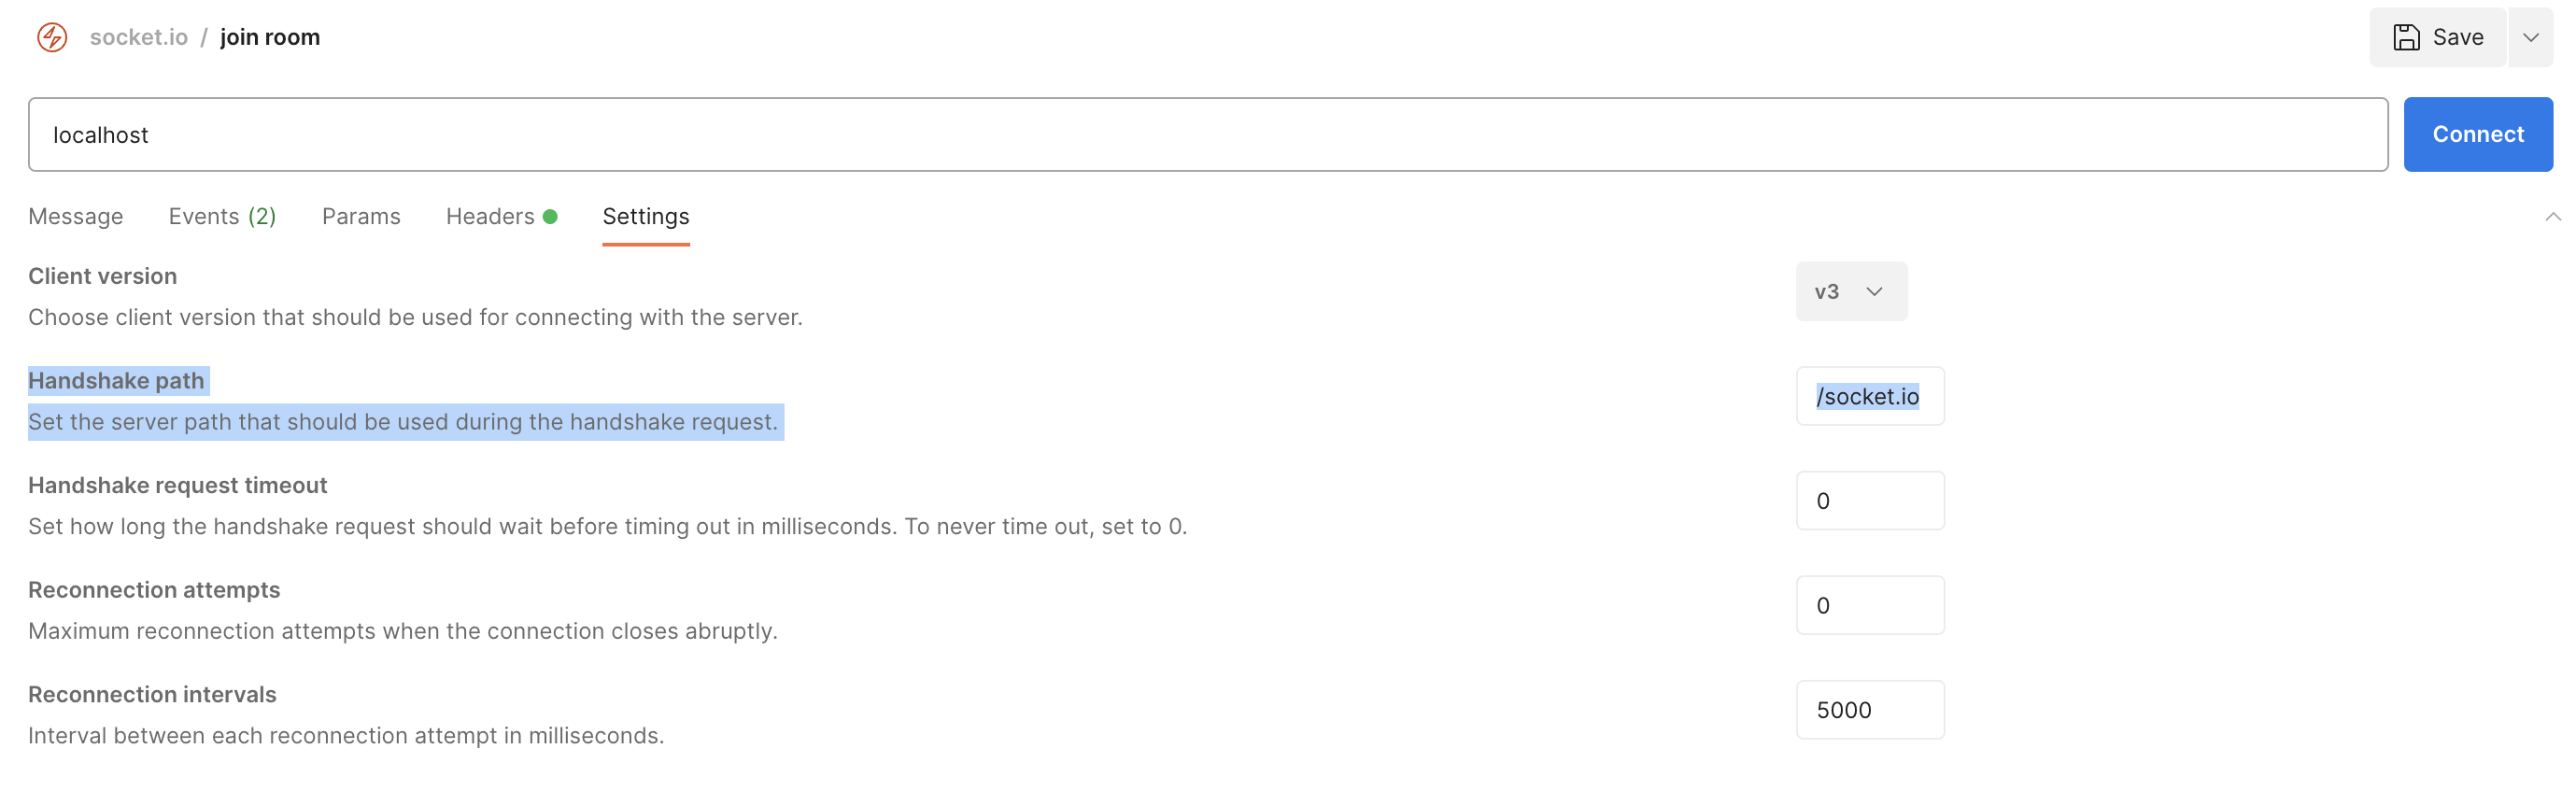
따라서 nginx의 reverse proxy를 설정할 때도 handshake를 위한 path를 지정해줘야 합니다.
pathDefault value:
/socket.io/
It is the name of the path that is captured on the server side.CAUTION
The server and the client values must match (unless you are using a path-rewriting proxy in between).
출처 : socket.io - client #path
이를 위해 Nginx의 config 파일에서 location 에 socket.io 를 지정해주어도 되지만 저는 클라이언트에서 요청하는 path와 서버측의 path를 다르게 주겠습니다. 이를 위해 서버 측의 path는 socket.io 를 사용하지만 클라이언트에서는 다른 path로 요청하도록 Nginx의 config 파일에서 location 을 /chat path로 요청하도록 하였습니다.
그리고 테스트를 위해 클라이언트 역할을 하는 postman의 setting에서 path를 /chat 으로 수정하겠습니다. 그리고 요청 host와 port는 localhost, nginx에서 설정한 80번 포트로 요청합니다.
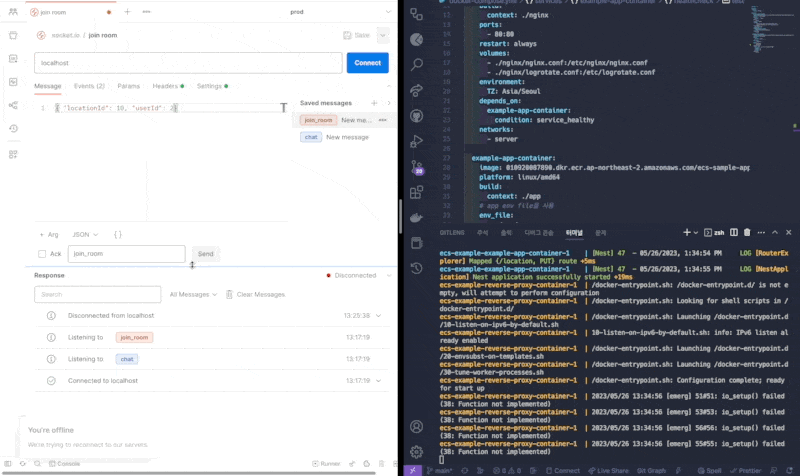
docker-compose로 실행한 앱 서버에서 정상적으로 socket의 정보가 출력되고 room에 join되는 것을 확인할 수 있습니다!
참고자료
MySQL - 확장 검색 - 공간 검색 - Spatial Data Types - Real MySQL 8.0
Saving and Retrieving Well-known Text (WKT) in MySQL or Postgres with TypeORM